Introduction: Redefining the “Ground” Beneath Us
In the world of interior design, flooring is often treated as the passive recipient of the room’s aesthetic. It is the background, the canvas, the silent partner to the loud furniture and the bold wall art. But at Original Cozy, we have always asked a different question: Why does the floor have to be silent?
We believe that the ground beneath your feet should be as active and alive as the rest of the room. We’ve experimented with ocean themes, bringing the beach indoors, but for our latest concept, we wanted to strip things back to the elements that define our brand: organic warmth and modern illumination. We wanted to build a bridge between the rustic past and the cybernetic future.
The “Luminous River” concept was born from a desire to invert the standard lighting model. Usually, light rains down from the ceiling, casting shadows on the floor. We wanted to know what would happen if the light originated from the floor, pushing the shadows up and creating a gravity-defying atmosphere. By combining ancient, live-edge timber with cutting-edge LED diffusion technology and industrial epoxy, we conceptualized a floor that breathes.
This isn’t just a renovation; it’s a terraforming project. Here is the comprehensive, step-by-step breakdown of how this dream build comes together, from the dust of the concrete to the final, glowing result.
Phase 1: Branding the Bedrock and The Blank Slate


Every masterpiece requires a pristine canvas, but in the world of industrial epoxy, that canvas is usually a dusty, cracked concrete slab. The first step in any major build is psychological as much as it is physical. We need to claim the space.
Before a single drop of resin is mixed, we start with the identity. In this concept, we stripped the warehouse floor down to its raw aggregate. To mark the territory, we sketched the “Original Cozy” logo in white chalk directly onto the center of the room.
This step might seem superfluous—after all, it’s going to be covered up—but it serves a vital purpose. It centers the build. It reminds the team of the vibe we are chasing. In a real-world application of this concept, we would seal this chalk logo with a thin clear coat, preserving it forever beneath the subsequent layers—a hidden “fossil” of the brand DNA buried deep in the foundation, known only to us and the client.
Once the branding is set, we move to the primer. Concrete is porous; it breathes, it releases moisture, and it holds dust. If you pour epoxy directly onto raw concrete, you risk delamination or bubbling. So, we roll out a heavy-duty, slate-grey industrial primer.
This grey layer acts as the neutral backdrop for our “river.” When the lights are off, the floor needs to look sleek and modern. This dark grey tone provides a high-contrast shadow that will make the wood grain pop and, more importantly, will prevent light bleed when we eventually install the LEDs. It creates a solid, uniform void that is ready to receive the organic elements.
Phase 2: The Live-Edge Puzzle

With the canvas primed, we introduce the chaos.
Standard hardwood flooring is about uniformity—straight lines, 90-degree angles, predictable patterns. We wanted the opposite. We wanted the floor to feel like a forest floor that had been flooded by a glassy river. To achieve this, we source massive, live-edge timber slabs. These aren’t your typical Home Depot planks; these are slices of giant trees, preserving the natural, waning edge of the bark line.
The logistics of this phase are heavy. The team has to manually haul these long, warping planks into the space, treating them like precious artifacts.
The placement is an art form in itself. We don’t just lay them side-by-side. We arrange them specifically to create “channels” of negative space. We look at the curves of the wood—the way the tree naturally grew—and we place the planks so that their curves complement each other, creating a winding, serpentine path between the wood.
This negative space is crucial. This is where the “river” will flow. If the gaps are too narrow, you lose the effect of the water. If they are too wide, the floor feels disconnected. We aim for a “meandering stream” aesthetic, varying the width of the gap from six inches to two inches, mimicking the random erosion of nature. We firmly secure these planks to the subfloor, ensuring they are perfectly level. Any warping here would ruin the glass surface later, so the mechanical bond between wood and concrete must be absolute.
Phase 3: The Technology of Light (The Hidden Phase)
While the photos show the wood and the resin, there is an invisible step that happens right before the pour—the installation of the nervous system.
In the channels between the wood planks—those winding grey rivers of negative space—we install high-density LED strips. For the “Original Cozy” vibe, we don’t use harsh, blue-white office lighting (5000K). We opt for a warm, golden tungsten hue (around 2700K to 3000K).
The trick here is diffusion. If you just lay an LED strip at the bottom of a hole and cover it with clear glass, you’ll see the individual dots of the LED diodes. It looks cheap; it looks like a strip mall sign. To achieve the “liquid light” effect, we have to diffuse the light.
Conceptually, we line the bottom of the channels with a milky diffusion layer. This scatters the light photons before they even hit the epoxy. The result is that the light doesn’t look like it’s coming from a bulb; it looks like it’s emitting from the substance itself, like radioactive magma or bioluminescent algae. We run miles of low-voltage wiring beneath the wood, channeling it all to a central smart-home driver that allows the user to dim the “river” from a roaring rapid to a gentle, ember-like glow.
Phase 4: The Liquid Glass Pour


Now comes the point of no return. The “River Pour.”
This is the most high-stakes part of the entire build. Industrial epoxy resin is a chemical timer. Once you mix Part A (the resin) and Part B (the hardener), you have a limited window—usually about 30 to 45 minutes—before the liquid turns into a solid rock. There is no “undo” button.
The team suits up in full Tyvek hazmat gear. This isn’t just for safety; it’s to prevent hair, dust, or lint from their clothes falling into the sticky resin. We mix massive buckets of crystal-clear, deep-pour epoxy.
We carefully pour the resin into the channels we created between the wood. This is a delicate dance. We have to pour fast enough to keep a “wet edge” (so the lines blend together) but slow enough not to trap air bubbles. The resin flows into the gaps, encapsulating the LED lights and sealing the raw edges of the wood.
This is where the magic happens. As the epoxy fills the void, it turns the rough, bark-covered edge of the wood into a museum display. You can see every splinter, every knot, every ring of the tree’s history, magnified through the clear liquid.
Once the channels are filled, we move to the “flood coat.” We pour a final, self-leveling layer over the entire floor—wood and resin alike. The team uses squeegees to spread this viscous liquid across the room.
The goal here is a unified surface. We don’t want you to feel the transition from wood to resin when you walk in your socks. It should feel like one continuous sheet of glass. The resin self-levels, gravity doing the work to pull it perfectly flat.
Phase 5: The Cure, The Bubble, and The Mirror

Once the floor is poured, the room becomes a “clean room.” No one enters. No windows are opened. We monitor the temperature and humidity with obsessive precision.
As the epoxy cures, it undergoes an exothermic reaction—it generates heat. This heat forces air bubbles to the surface. In a conceptual build like this, clarity is king. If the resin is cloudy, the light won’t travel. We need optical clarity equivalent to a diamond.
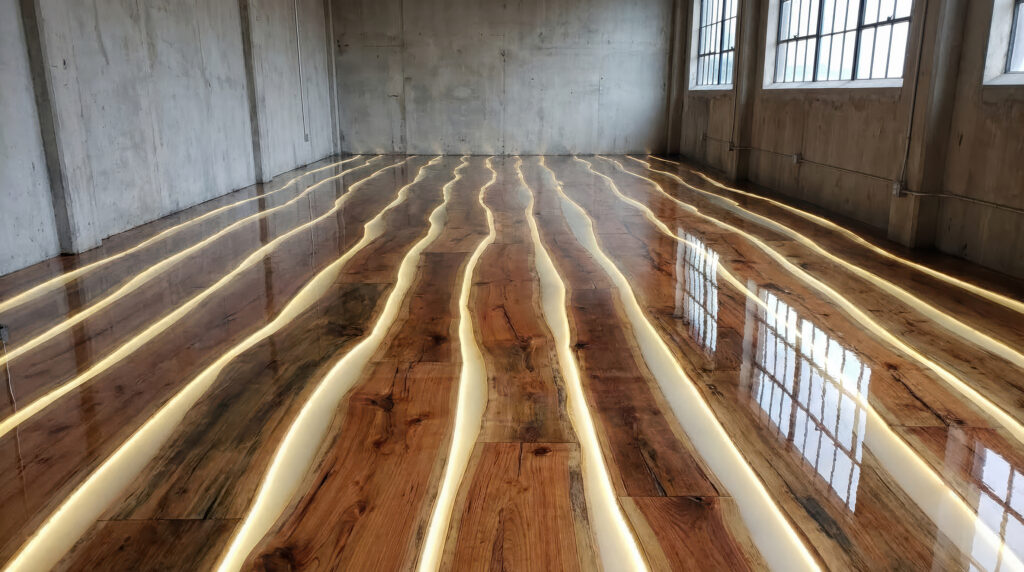
We can see the intermediate stage in the process where the floor is wet, glossy, and reflecting the warehouse windows like a perfect mirror. At this stage, the floor looks like a frozen lake. The wood appears to be floating just below the surface of the ice.
This curing process creates a surface that is incredibly durable. It is resistant to impact, waterproof, and chemically inert. It preserves the wood indefinitely, stopping it from rotting or warping because it is completely sealed off from oxygen. We are essentially fossilizing the forest floor in amber, but clear amber.
After the cure is complete (usually 72 hours), we perform the final finish work. In some cases, we might sand the top to a matte finish for better grip, but for the “Luminous River” concept, we stick with the high-gloss polish. We want that wet look. We want the floor to look like it’s still liquid, even when it’s hard as stone.
Phase 6: The Final Reveal – A River of Light
The final step is the simplest, but the most dramatic: We turn off the overhead lights, and we turn on the floor.
The transformation is instant. The room goes from a cold industrial warehouse to a warm, mythical landscape. The light pushes up through the clear epoxy channels, illuminating the room with a soft, diffused golden glow.
This is the “Original Cozy” signature.
Look closely at the final result. The light doesn’t just shine up; it shines sideways into the wood planks. It illuminates the grain from the inside out. You can see the red and orange hues of the timber catching the light, creating a warmth that no paint color could ever achieve. The curving lines of light guide the eye through the room, making the space feel longer, larger, and more organic.
Functionally, this lighting serves as the ultimate mood lighting. It’s perfect for a lounge, a creative studio, or a dream living room. It eliminates the harsh shadows cast by down-lighting. Instead, everyone and everything in the room is underlit by a soft glow, which is universally flattering and incredibly relaxing.
Conclusion: The Future of the “Cozy” Ecosystem
The “Luminous River” concept is more than just a flashy floor; it’s a statement about how we interact with our environments. It challenges the static nature of building materials. It suggests that our homes can be hybrids—part nature, part machine.
By fusing the raw, imperfect beauty of live-edge wood with the precision of modern lighting and resins, we create a space that feels timeless. It’s a cabin in the woods, updated for the year 2050.
At Original Cozy, we are constantly pushing the boundaries of what a “room” can be. Whether it’s an ocean kitchen that brings the tide to your toaster, or a river of light that flows through your living room, our goal remains the same: create spaces that transport you.
We are currently developing kits and guides for the brave DIYers who want to attempt a scaled-down version of this concept (perhaps a coffee table or a desk before tackling the whole floor). But for now, we hope this deep dive gives you a glimpse into the future of flooring.
The floor doesn’t have to be just a floor. It can be the light source. It can be the art. It can be the river that runs through your home.
